10 Braided Heatless Hairstyle Edeas for Winter!
10 braided heatless hairstyle ideas for winter! There’s a good mix of different up-dos and down dos, braided hairstyles, messy buns etc so I hope you find some inspiration on how to do your hair in the winter season!
What is up everyone and welcome back to
my channel so in today’s video as you
can see by the title look we are doing
yet another hair tutorial in today’s
video I’m gonna show you guys how to
create 10 different heatless hairstyles
which was super easy super simple to
recreate I find that these hair cells
are perfect for like autumn winter and
like the festive seasons but of course
you can rock them all year round if you
guys are like me and you don’t really
know what to do with your hair half the
time then this video is perfect for you
and I hope you guys get some inspiration
from this I’m really excited because
today’s video is actually in
collaboration with Tangle Teezer if you
guys have been watching my hairstyles
for a little while you all know that
literally Tangle Teezer is the only hair
brush i ever use and you definitely be
very familiar with this little fella
this brush right here has seen me
through the toughest of days with my
hair and also it’s been featured in
quite a few head tutorials of mine I’m
actually really excited to share this
with you guys but tangle teezer are
having this really exciting a service on
their website this year for Christmas
where they allow you to print your own
picture on a tangle teezer brush so it
comes in a really cute box like this and
basically what I got printed on my brush
is my cat Timmy because Timmy is
literally like my best friend he is the
family cat and I don’t really see him
very often so I just thought you know
every time I brush my hair I will think
of him but I just got mine printed on
the on-the-go brush which comes with a
lid so it’s perfect for traveling but of
course you can print on whatever you like
this will make it such a great gift for
someone for Christmas so yeah I just
thought I’d let you guys know about
there’s no service that they’re doing
right now because currently they’re
having 20% off which is amazing I will
link the link down below where you can
make your own customized brush but
anyways if you guys want to see a 10 at
different heatless hairstyles then let’s
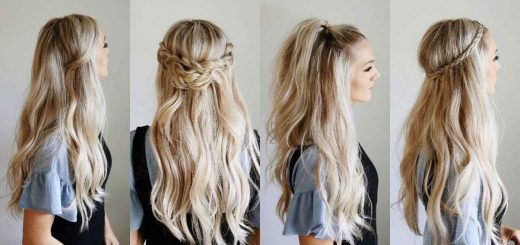
get on into the video okay so for the
first hairstyle I’m gonna recreate at
this really cool top ponytail that is
very much inspired by ariana grande the
first thing you want to do is you want a
section of your hair into a very kind of
over swept slide party now the way I
find out where my part should be is I
actually kind of align it with the arch
of my eyebrow and I feel like that just
works really well structurally for the
face so that’s exactly what I did and I
also sectioned off a chunk of hair on
the left hand side of my face and kind
of kept that away too later on create
that really cool foa’s side fringe once
you’ve sectioned it off you just want to tie
with a hair tie or clipper with a clip
so that it doesn’t get in the way I then
basically took to the back of my head
and I sectioned off the majority of my
hair at the top leaving a very small a
thin strand of hair right at the bottom
of the nape of my neck gonna use that
later on to kind of conceal the rest of
the faux fringe the next what you want
to do is you want to take the majority
of your hair that we have kind of left
and sectioned off and you want to
basically tie that up into a very
extreme high ponytail the next step is
to kind of take care of the side fern so
what I did is I kind of pulled it across
the left side of my forehead and clipped
you into place right behind my ear once
you’ve clipped it into place you kind of
want to drag it towards the top of the
ponytail and we’re then gonna use the
kind of layer of hair that we’ve left
out on the nape of the neck and we’re
gonna use that to conceal at the
remainder of the head that we used for
the side fringe I really hope that makes
sense I’m just doing this to basically
conceal the rest of the hair as my hair
is quite long and it’s not really a
fringe once you have pulled the hair all
together you want to tie it into place
at the top of the head to create the
very extreme high ponytail and to finish
it off if you like you can then take a
strand of hair from the back of the pony
and kind of wrap it around the base of
the hair tie I just find that this
conceals the hair tie really well and it
makes the hair look so much more put
together and this is the finished look I
love this hair sauce so much I think
it’s really classy it’s definitely ready
inspired by ariana grande as she’s been
wearing this sort of hairstyle recently
quite a bit especially in the music
video where she collabed with Troye
Sivan I really loved her hairstyle in
that for the next half hour we have
another ponytail this one’s a little bit
different because it’s a low ponytail
for this one what you want to do is you
want to section off at the top half of
your hair and you want to back home this
to kind of give it that extra volume at
the top so for this I’m again using my
back homing Tangle Teezer to really get
that volume in there you can also use
some hairspray or dry shampoo to really
aid in that volume once you have
achieved the volume that you’d like you
then just want to smooth any parts over
of your hair that might have gone a
little bit too messy and you want to
gather all of the hair at the back of
the head not too high not too low kind
of somewhere in between again for that
finishing touch for this hair star I’m
just taking a strand of hair and
wrapping it around the base of the hair
tie and then kind of roughing up and
back homing the hair and pulling out
some strands of hair right by the face
to frame it a little bit better and this
is the finished hair look I think this
is so classy really effortless
and it’s just a really nice way to get
your hair out of your face while still
looking cute with a very minimal effort
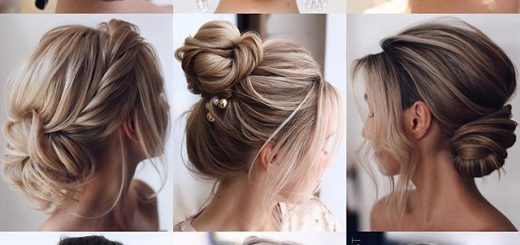
now for this next hairstyle you can take
the last hairstyle and take it that step
further and basically what you want to
do is you want to take your hair twist
it and wrap it into a low bun I find
that this hairstyle is so chic I see so
many celebrities wearing this hairstyle
namely Gigi Hadid she wears this
hairstyle all the time and it looks
freaking a bomb so I really really love
this hair so it’s so easy to recreate so
definitely don’t forget about the good
old low bun it is a classic now on the
contrary we love a good old top bun as
well so we’re definitely gonna give us
some love in this video I like to do my
top knot buns especially if you’ve got
long hair I know it can be a little bit
tricky the first thing I do is I gather
all of my hair I kind of sometimes flip
my head over because my hair is so long
it’s just easier to kind of flip it over
and let gravity do the work I then tie
all of my hair into a super high
ponytail and on the very last time you
don’t want to pull your hair all the way
through you want to kind of leave a
little loop and kind of pull it to the
size that you like you can make it
bigger you can have it quite small it’s
really up to you now if you’ve got long
hair and you’ve still got so much hair
remaining after the hair tie what you
want to do is you want to pull the bun
all the way round to close it and kind
of take that loose hair that is not
doing anything and just kind of shove it
in tuck it into the bun now I don’t know
if you guys have ever used a hair donut
but doing this kind of act as a hair
donor all by itself so if you’ve got the
hair if you’ve got the length you might
as well take it and use it to your advantage
having that remainder of your hair
shoved into the barn it definitely keeps
the hair a lot more volumizer and will
keep it a lot more perky all day long
now if you guys feel like a little bit
of an egg with a topknot bun I know I do
put your hands up if you do as well what
I like to do is I just take some chunks
of my hair right by my ear and my face
and kind of frame it a little bit better
I honestly feel like doing this makes a
world of difference for the next
hairstyle we’re basically creating a
really quick Dutch braid at the back of
the head this is a super simple
hairstyle once you get the hang of there
the first thing you want to do is you
want to section off the top half of your
hair at the back into three sections
just like you would with a regular braid
now instead of kind of going over and
crossing the strands over each strand
instead what you want to do is cross
them underneath each strand and
basically do a regular braid but
reversed I’m sure most of you guys know
how to Dutch braid but in case you don’t know this is
you basically just take one strand cross
over into the middle take the left
strand and do the same whilst you’re
braiding you want to take chunks of hair
off either side and kind of add that
into the existing braid this is just
gonna make sure that the hairstyle is
nice and flowing all the way throughout
and it basically is incorporating all
the hair as you kind of get down to the
back of your head now don’t feel too
discouraged if you can’t do this on your
first try it took me forever to master
this and I still feel if I can’t do it
perfectly but practice it definitely
makes perfect so make sure you keep
trying I really love this hair saw I
think it’s so effortless it just gets
all of the hair out of your face in a
really nice and organized way and it
just looks so cute from the bag now for
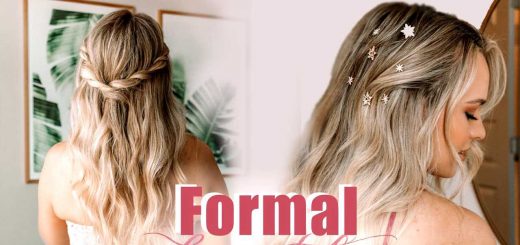
this next hairstyle what you want to do
is you want to take two chunks of hair
from either side of your face wrap them
around your head towards the back and
tie them with a clear elastic tie what
you then want to do is you want to take
your little ponytail but you’ve just
created and kind of a loop here on
itself what this does it just creates a
really cool twist at the back of the
head without you really having to do too
much now with the remainder of the
ponytail what you want to do is you want
to start braiding this with a regular
braid so you just want to split the
ponytail into three sections take the
right section cross it on into the
middle take the left section and do the
same when you get to the very bottom of
the braid you want to tie it off with a
clear elastic tie and you then want to
go ahead and pull the braid apart to
create a lot more volume this technique
is great if your hair isn’t very thick
honestly it just makes a world of
difference if you just tug on certain
parts of the braid it really makes it
look so much more volumize and this is
the finished hairstyle I love this one
it’s so much it’s so easy and really
really cute this next hairstyle is kind
of like a half updo half down dude what
we’re doing is we’re basically taking a
chunk of hair from the top of the head
on each side of the head and we’re
basically just braiding that so I’m
gonna start from my right-hand side I’m
just basically taking a chunk of hair
I’m braiding it all the way down and I’m
just tying it off with a clear elastic
tie once I’ve done the right-hand side
and then repeating the same thing to the
left-hand side and this is kind of what
it looks like I think it looks really
effortless and kind of cool a little bit
different if you wanted to you could
also take those braids and kind of twist
them into little side buns I think that
would be all really cute hairstyle as
well first Knicks heads up what you
wanna do is gather your hair into a kind
of low ponytail and it’s hide that off
with a hair tie once you’ve secured it into play
t-then just want to kind of pull the
hair apart and leave kind of like a
space for the rest of the hair to kind
of go in as you can see how I’m
basically tucking at the rest of my
ponytail into that gap that we’ve just
created at the nape of my neck what this
does is it creates a really cool a
follow bun sort of hairstyle without
really having to do any work at all and
to finish off this hair so you then just
want to take some it pops up the hair
around the face you want to pull it
apart a little bit make it a little bit
more messy and I’m done you guys know
the drill I love a bit of a messy
hairstyle this next hairstyle is a super
simple one I love doing this when I’m
running late so what I do is I basically
section off the top part of my hair and
I kind of create a ponytail right at the
back of my head but instead of kind of
pulling it through and making it a
ponytail I like to leave it as a loop on
the very last hair tie and this sort of
creates kind of like a loops little bun
on the back of the head it’s super messy
super quick again if you want to frame
the face a little bit better with this
one you can take some chunks of hair out
and I just really love this one I think
it’s really quick and really easy
especially if you’re running late or if
you just want to get your hair out of
your face when you’re tidying the house
and for the very last hairstyle we’re
creating a really cool at three
dimensional braids now this one can be a
little bit tricky so listen up sober
this hairstyle what I’m gonna do is I’m
gonna take all of my hair and kind of
tie it off into a Sider ponytail I find
that putting it off to the side rather
than towards the back makes this a lot
more manageable to do especially on your
first go so the first thing I do is I
section off my ponytail into three
sections as usually would with a regular
braid and then taking the very fast
segment on the right and I’m kind of
splitting that chunk of hair into two
portions once I’ve sectioned it off I’m
then taking the middle chunk of the hair
and I’m kind of looping it directly
through at the very middle of those two
sections of the head that we’ve just
separated that leaves us with the split
section in the very middle now next
thing you want to do is you want to
twist those two sections on each other
once you have twisted them you then want
to take the very left section of the
hair and kind of loop it through again
directly through the sectioned off part
of the Hat once you have done that
process it’s basically the same thing
all over again so it’s super simple once
you get the hang of it like
I said but it can be kind of tricky to
get that process down on your first go
so please stay patient with this one so
again I’m taking it the left section of
my hair I’m sectioning it off into two
portions and then twisting this two at
separate strands of hair on each other
and looping the very last part of the
hair through it once again so at the end
of each process you’re sectioned off
portion of the hair should be on the
very other side then the side that we
started off with now this braid works
best when you really pull it tight and
keep on top of that tension as you’re
braiding the hair and when you get to
the very end of your braid this is what
it should look like it should kind of
have a side like a 3-dimensional side
from each way you look at it I love this
hairstyle so much I think the braid is
super unique and we don’t really see
braids like that very often in person so
I am really really happy with his
hairstyle so those are all of my ten
heatless hairstyles I’m gonna show you
guys today I really hope you guys I find
this video helpful and find some
inspiration for some hairstyle I’m gonna
say this is probably my favorite
hairstyle of the whole video and I kind
of feel like think about which I am not
mad about if you guys want to see more
hair tutorials from me I will have a
whole playlist of all of my hair
tutorials that I’ve done over the past
however many years I’ve been on YouTube
there is quite a lot you guys there is
quite a lot you guys decide to recreate
any of these hairstyles make sure you
tag me on Twitter or Instagram at Rock
Sora’s come and follow me and we can be
friends but that is all from me thank
you so much for watching I hope you guys
enjoyed and I’ll see you guys in my next video bye